We are starting a series of posts for end users who are not familiar with Linux commands. These commands are very easy and powerful. Linux has evolved as a great choice for desktop OS and most of the tasks can be accomplished from within the GUI. But still, we may need to use the command line interface in case of an emergency where GUI is not available or for remote administration(Telnet, SSH etc.) from a place with a very low bandwidth.
In this post we’ll learn how to navigate around using command line. We are currently using Linux Mint. To practice start the ‘Terminal’ from the ‘Accessories’ section of the main menu. Please note that Linux commands are case sensitive.
1. pwd – Print Working Directory. This command outputs the current directory the user is in. For a Linux desktop user, it is typically ‘/home/<user-name>’. Every thing in Linux is represented as a folder or a file. ‘/’ is the root directory and all other directories fall under this directory (more about the Linux directory structure in the next part). So, if your user name is ‘sam’, your home directory will be ‘/home/sam’.
2. ls – List. This command lists the contents of a directory.
To view the directory contents in long format, issue the command:
ls -l
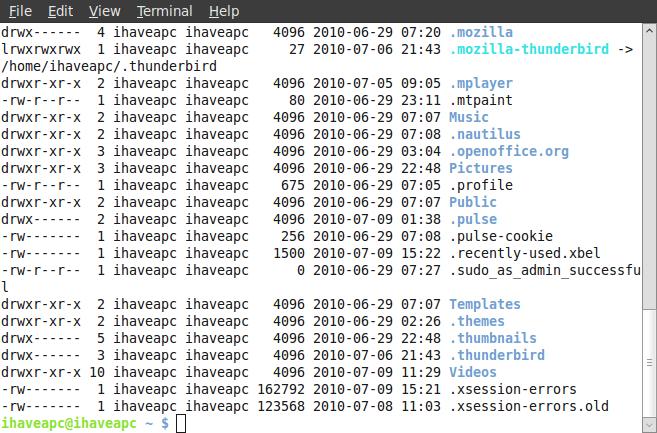
In the above screenshot, you can see the output of list command in long format. The first column represents user permissions, which will learn about in the upcoming posts. Second column represents number of files/folders in that directory. Third column represents the owner. Fourth column represents the owner’s group. Fifth column represents the size in bytes. Sixth and seventh columns represent the date and time modified respectively. Last column represents the file/folder name.
In Linux, a hidden file/directory name starts with a dot i.e. ‘.’. If you want to view the hidden files/directories then issue the following command:
ls -la
Also note that in the above screenshot, the colored entries are directories and black entries are files. Notice the second entry, which has ‘->’ in it’s name. It is a link, which is similar to shortcut file in windows. In above case, ‘.mozilla-thunderbird’ is a link to actual directory ‘/home/ihaveapc/.thunderbird’.
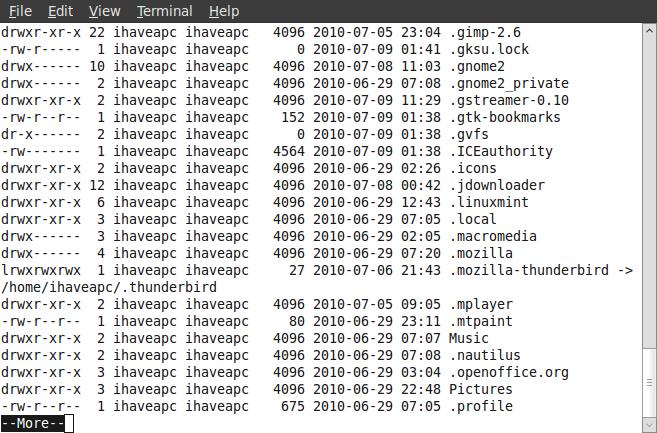
Also, note that the output has scrolled too fast for the user to read. To make the output readable, we will use two things- a pipe (|) and ‘more’. Pipe will cascade output of one command as a input of the second command. Command ‘more’ will instruct the system to display output screenful at a time until space key is pressed. Hence, if we issue command:
ls -la | more
then, we will get the same output as above but screenful at time until user presses the space key to advance to the next screen.
3. cd – Change Directory. This command allows you to change the current working directory. Syntax is simple: ‘cd <directory path>’. To go to the root directory, issue the following command:
cd /
After changing the directory, you can use ‘pwd’ command to check your current directory. You can issue command:
cd ~
from any directory to go back to your home directory.
You can issue command:
cd –
to switch back to previous directory in which you were working before issuing last ‘cd’ command.
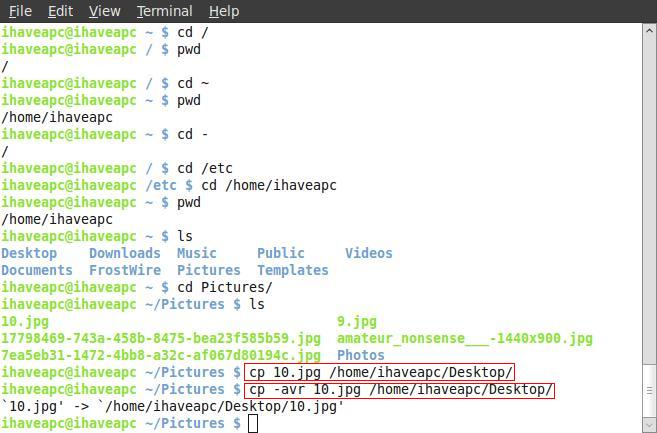
Also, notice that when we changed to directory ‘/etc’ by issuing command ‘cd /etc‘, the directory path is displayed on the left side of the ‘$’ sign. When we changed to home directory by issuing command ‘cd /home/ihaveapc‘, ‘~’ is displayed on the left side of the ‘$’ sign. Recall that ‘~’ represents home directory.
4. cp – Copy. The syntax is simple ‘cp <path to the file/folder to be copied> <path where the file/folder is to be copied>’
In below screenshot, we have changed to directroy ‘/home/ihaveapc/Pictures’ and we want to copy the file ’10.jpg’ to ‘/home/ihaveapc/Desktop’. Hence, we issue the following command:
cp 10.jpg /home/ihaveapc/Desktop
However, notice that we did not get any message on screen as the file was copied. Hence, we can issue the ‘-avr’ option. ‘a’ means archive(preserve link and permissions), ‘v’ means verbose(show what is being done), ‘r’ means recursive(copy recursively). Hence, we issue the following command:
cp -avr 10.jpg /home/ihaveapc/Desktop
Note that the previously copied ’10.jpg’ in ‘Desktop’ directory was overwritten without confirmation. To avoid this we will use the option ‘-i’. ‘i’ means interactive(confirm before overwriting). Hence, the above command will be modified to:
cp -iavr 10.jpg /home/ihaveapc/Desktop
5. mkdir – Make Directory. Syntax is simple ‘mkdir <directory name to be created>’
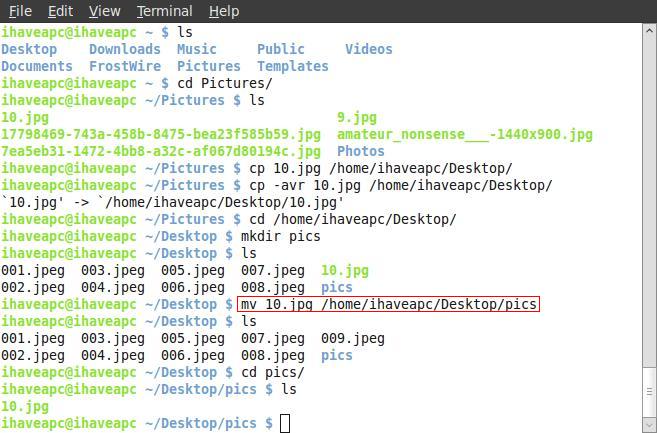
Now, we make a directory ‘pics’ in the ‘Desktop’ folder by issuing the following command:
mkdir pics
6. mv – Move. The syntax is simple ‘mv <path to the file/folder to be moved> <path where the file/folder is to be moved>’
We need to move the file ’10.jpg’ from directory ‘Desktop’ to directory ‘pics’. For this we will issue the following command:
mv 10.jpg /home/ihaveapc/Desktop/pics
7. rm – Remove. This command deletes a file/directory. Syntax is ‘rm <file/directory name to be deleted>’
We need to delete file ’10.jpg’ in directory ‘pics’. Hence, we issue the following command:
rm 10.jpg
However, if we try to delete a directory which has files/folders in it, system will not delete it and will tell you that the directory is not empty. Hence, we can use ‘-rf’ option in such cases. ‘r’ means recursive(delete recursively), ‘f’ means force(do not prompt about non-existant files). Hence, we issue the following command to delete ‘pics’ directory:
rm -rf pics
[Be very careful while using the above command. Never run the above command on root directory as a root user.]
That’s it for today. More to come in the next part. Have fun with Linux!
[ Check out rest of the series : Part II, Part III, Part IV, Part V and Part VI ]


[…] use them efficiently, please refer to our multi-part Linux command line basics series starting from here. […]
[…] After the file has been downloaded, open the terminal and change the directory to the folder where you have saved the downloaded file. Now issue the following command at the […]
[…] To understand how powerful Linux commands can be, do take a look at our Linux command line basics turorials. […]
[…] command at the terminal -sudo apt-get install zgv2. After the installation is complete, use the cd command go to directory in which images are present.3. Once in the directory with images, issue the […]
[…] package file.3. After the *.deb package file has been downloaded and saved, open the terminal and change the directory to where you saved the file. Now, issue the following command at the terminal -sudo dpkg -i […]
[…] 2011 with No Comments For finding/printing the current working directory in Linux, we have pwd command to […]
[…] learn a few more Linux system information commands. Those who are new to this site can read part 1, 2, 3, 4 & 5 of this series for better understanding. Let’s get […]
[…] hope you have found today’s and the parts 1, 2, 3 and 4 of this series useful. We’ll be back in next part with more system information […]
[…] who are new to this site, you can read the first three parts of the Linux command line basics here- Part 1, Part 2, […]
[…] how to do cool and useful things using the shell/terminal, refer to this earlier in-depth tutorials here, here and […]
[…] case you don’t find the picture funny here are the command line Linux tutorials 1,2 and 3 that make the above sandwich context funny as hell plus you can get up to speed with the […]
[…] will learn how to manage users and groups. For those of you who are new to this site, do read the first part and the second part of the Linux command line basics before continuing. Let’s get […]