Continuing from Part 2, in this third part of the tutorial, well learn how to create ZFS storage pools with RAID 10, RAID 50 and RAID 60.
We will use the same 9 virtual HDDs of 1 GB each used in Part 2 to create these pools after destroying the ZFS pool MyPool1, MyPool2 and MyPool3 (more on destroying ZFS storage pools in Part 4).
RAID 10 is a series of striped mirrors. In this tutorial, we’ll create a striped RAID using 3 mirrors. Let’s get started –
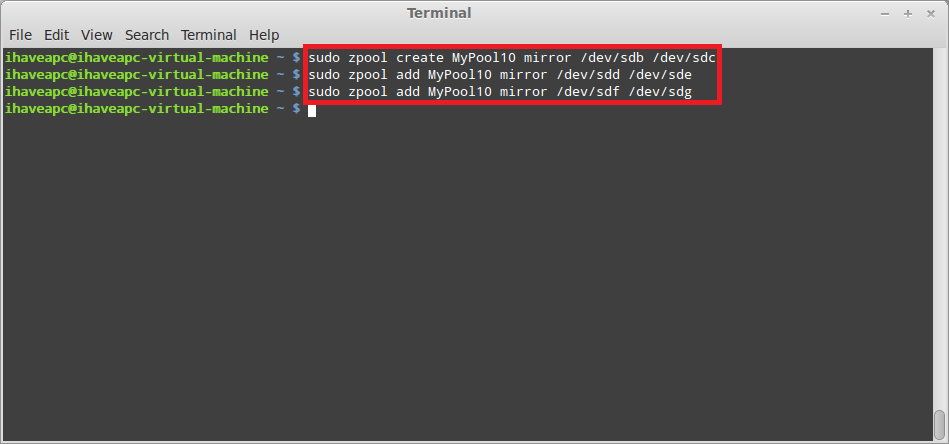
1. Create a mirror using HDDs /dev/sdb and /dev/sdc by issuing the following command at the terminal –
sudo zpool create MyPool10 mirror /dev/sdb /dev/sdc
2. Now, we will create and add 2 mirrors to MyPool10 to get a RAID 10 array. Issue the following commands at the terminal –
sudo zpool add MyPool10 mirror /dev/sdd /dev/sde
sudo zpool add MyPool10 mirror /dev/sdf /dev/sdg
3. You can verify the status, capacity and mount point of the ZFS storage pool by issuing the following commands at the terminal –
sudo zpool status
sudo zfs status
Notice that we have 3 striped mirrors in the RAID 10 array. Hence, the total available capacity is around 3 GB.
3. Let us create a RAID 5 (RAID-Z) array using HDDs /dev/sdb, /dev/sdc and /dev/sdd by issuing the following command at the terminal –
sudo zpool create MyPool50 raidz /dev/sdb /dev/sdc /dev/sdd
4. Now, we will create and add 2 RAID 5 (RAID-Z) array to MyPool50 to get a RAID 50 array. Issue the following commands at the terminal –
sudo zpool add MyPool50 raidz /dev/sde /dev/sdf /dev/sdg
sudo zpool add MyPool50 raidz /dev/sdh /dev/sdi /dev/sdj
5. You can verify the status, capacity and mount point of the ZFS storage pool by issuing the following commands at the terminal –
sudo zpool status
sudo zfs list
Notice that we have 3 striped RAID 5 (RAID-Z) arrays in the RAID 50 array. Hence, the total available capacity is around 6 GB.
6. Let us create a RAID 6 (RAID-Z2) array using HDDs /dev/sdb, /dev/sdc, /dev/sdd and /dev/sde by issuing the following command at the terminal –
sudo zpool create MyPool60 raidz2 /dev/sdb /dev/sdc /dev/sdd /dev/sde
7. Now, we will create and add a RAID 6 (RAID-Z2) array to MyPool60 to get a RAID 60 array. Issue the following command at the terminal –
sudo zpool add MyPool60 raidz2 /dev/sdf /dev/sdg /dev/sdh /dev/sdi
8. You can verify the status, capacity and mount point of the ZFS storage pool by issuing the following commands at the terminal –
sudo zpool status
sudo zfs list
Notice that we have 2 striped RAID 6 (RAID-Z2) arrays in the RAID 60 array. Hence, the total available capacity is around 4 GB.
[To be continued in Part 4…]


[…] Continuing from Part 3, in this part of the tutorial, we will learn about modifying the properties of the ZFS pool and […]
[…] on July 11, 2012 with No Comments Continuing from Part 3, in this part of the tutorial, we will learn about modifying the properties of the ZFS pool and […]
[…] [To be continued in Part3…] […]